Electronics

The Lafayette Robotics Club bought a RepRap. I brought it home over the summer to tinker with, and here's what I've done.
3d view of the PCB
Bitmap2Component icon

World's worst RNG.

I've been working on a USA medallion recently, and wanted to add a flickering effect. Something to make the lights twinkle randomly. That's not too hard on a real PC, where resources are cheap. But the ATTiny 44 I'm working on has only 128 bytes of ram. (That's 1/8th of a kilobyte, which is 1/1000th of a megabyte, which is itself 1/1000th of a gigabyte, which is what your computer has.)

Most of the RNG's around need 4 bytes or so for storage, and more for calculation. Mine doesn't! (It's also not very random, but you can't have everything for free.)

Graphic Copper in Kicad

Bitmap2Component icon
Doesn't look like much, does it?

For my trinket, I wanted to make the front side unmasked copper, since it's shiney and reflective and looks cool. KiCad supports converting graphics to component files, but only for the silkscreen (user text) and soldermask (the green stuff) layers. But, with the new plaintext components, it's trivial to get graphic copper. Here's how.

Bitmap2Component iconStart by opening Bitmap2Component. From  the main KiCad window, it's the icon to the side here. That'll open the program shown below. You can follow the usual way of creating a component: click on Load Bitmap, adjust the threshold value to select which parts are in the component file, and so on. The Black&White tab shows the final outline. For copper, try to use a resolution above 300dpi (600 or 1200 is best); modern processes can create really, really small features, and you want to take advantage of that. When you're done, save it as a Pcbnew file (.kicad_mod). It doesn't much matter which layer you use, but I'll pretend you're using the Front Silk Screen layer.

Flashlights!

Front of the flashlight
One flat flashlight.

Last year, Helen, Haley & I (we call ourselves the Technology LLC when we're trying to sound official) volunteered at the local elementary school with SWE. They worked with the entire 4th grade class. After dividing children into groups of 4-6, each one recieved some flavor of an Agilent educational kit. For simplicity, we only used three kinds: a solar-powered car, an electronic matching game, and ... something else. It's not important.

Remote Twitter

Seniors at Lafayette College take a course entitled Senior Design. It's a shockingly creative name. Snark aside, the class is wonderful. The course is very lab-heavy (the lecture ties up loose ends, but isn't as rigorous as a typical class).

Over the course of a semester, groups of two implement a stripped-down version of WiFi based on the professor's specifications. We're given a radio transmitter / receiver, and are left to design the rest of the link.

Etching Away

This is a continuation of my work with a solar-powered USB charger. See the last article here.

A few days ago, I tried etching the board. It's nearly the first time I've etched anything at home, and it didn't quite work. (Etching, FYI, is the process of masking a copper board, dissolving the exposed copper with a reactive salt, and then removing the mask to reveal a printed circuit board.) Although the traces were beautiful, the entire board was mirrored vertically.

PCB layout for the power regulator The first etch wasn't a complete waste of copper, though. I found that my inductor footprint was twice the size it should have been (diameter != radius) and that the regulator's feedback was mistakenly connected to the switching supply, rather than the stabilized voltage by the capacitor. With that in mind, I trashed my original revision of the printed board and drafted one half the size. (The original had a lot of empty space.) I'm going to try etching again later today.

SunCell

All of my parts, arrayed across the table.
So much electronic loot.

For years (and years), I've dreamed of making a little solar charger. You know, some little gizmo with a solar cell on one side, USB power on the other, and magic in the middle. That's always been the trouble, though: until recently, I didn't know enough magic electrical engineering to design one.

Now that I do, I'm a little surprised by how little the hard parts aligned with the parts I thought would be tough. The first time that I thought about this, back in high school, I was concerned about charging batteries. Everything else, I thought, would work off-the-shelf. Charging itself is the simplest part of the design.

So what was difficult? I'll get there. First, I want to talk about the parts I used and the design process.

E-Stop

Original E-Stop Circuit
The LRC circuit, up top, runs the show.

You probably know I'm working on building an autonomous robot as a senior project by now. (Psst. If not, read about it. Here.)

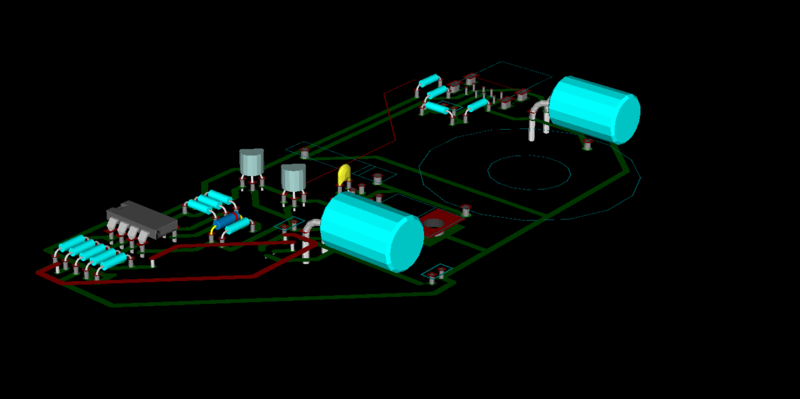
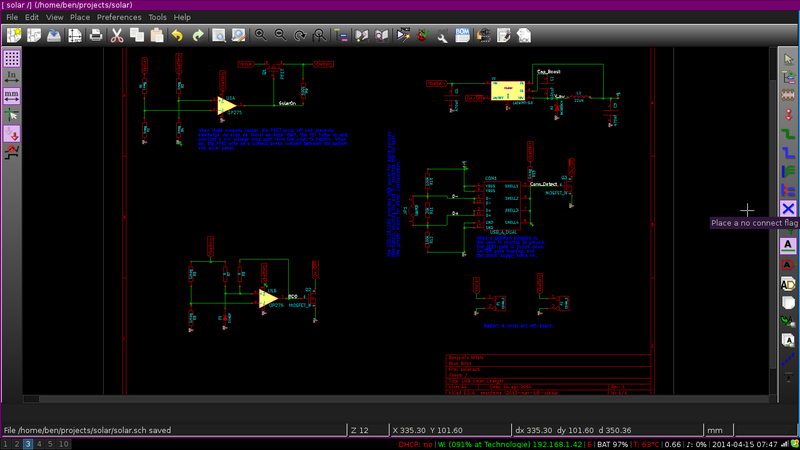
Now, this robot is driven by a pair of horsepower motors. Given full throttle, it'll easily hit 30mph. Even with safeties baked into the autonav code and Arduino motor driver, we need emergency stops. In fact, we have three. One's implemented in the packet radio: we've defined a code that will immediately kill the robot. A button on the robot will cut power to the main relay. The third E-Stop is a hardware radio E-Stop. That's the most interesting one, and I'm going to talk a bit about how it's designed. And since you're such great listeners, you'll listen. Thanks!

The radio E-Stop comes has a few requirements. I'm going to put them in a list, since I just realized that breaking up text makes it easier to read. It must:

  1. not use any software (microcontrollers are presumably banned).
  2. have a range exceeding 100'.
  3. bring the robot to a "quick and complete stop".
  4. be held by the judges during competition.

Okay. The last 'requirement' isn't technical, but it requires the E-Stop to be portable. 

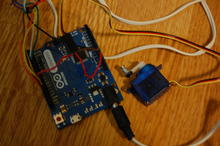
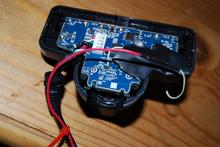
Given those requirements, I started putting together details about the e-stop. It needed a radio good to 100', so I found a cheap transmitter/receiver pair on Sparkfun. They're friendly in that they're easy to use, but that suggests a problem: what if someone else at the competition uses the same radio? We clearly needed some way to distinguish our E-stop from potential random noise. But it can't be too complicated; we're on a deadline and can't use software to distinguish long patterns. 

Radiheater

Yesterday, I went for a walk. Getting outside is always relaxing, and the town was beautiful in the dark, decked out for Christmas.

I also saw a broken electric radiator curbside. At least I hoped it was broken. On the way back home, I found the house again, hefted the thing onto my shoulder, and carried it a mile home. (I set it down too hard when I arrived and broke two of the casters. Now it was definitely broken.)

Hopeful, I plugged it into the wall, turned it on, and... nothing! Hooray! I had an excuse to take it apart. (The heater, by the way, is supposed to retail for $80. It's also got bad reviews, but hey. Free.)

Resurrection

Last year, before I left for college, my parents bought me a Lenovo SL510. I love the computer - it's passably rugged, ugly as sin, its bezel makes a great drawing surface, and it runs Linux like a champ. (I used to dual-boot, but that's neither here nor there.)

In the back right corner, the laptop has a plug for the power adapter. Over the summer, the power plug broke. The adapter connects to the board with some wire; that remained intact. But the plug broke loose from the computer's chassis and started wandering around inside. Most of the time, it'd move a few millimeters, and I'd drag it back to the proper slot, then plug in the power. Last week, it did something different.

Critical Repairs

A while ago, I found some electrical solder. I was excited. So much so that I had to hammer out something random, using parts I had on hand. The result was an adaptor that would connect my computer's 3.5mm sound output to a stereo's twin RCA inputs.

As I've said before, it worked perfectly. With one qualifier. It just broke. The 3.5mm jack I used had fairly flimsy legs, and they gave up after a few weeks of being bent back and forth.

Pages